|
libpandac
0.0.0
A library designed for a comm.ai Panda.
|
|
libpandac
0.0.0
A library designed for a comm.ai Panda.
|
Libpanda is a software library and set of utilities intended to interface with vehicles via comma.ai's Panda and optional Giraffe. The source for the library is located here:
https://github.com/jmscslgroup/libpanda
Full Raspbian-based images with ROS/libpanda preinstalled can be found here:
https://github.com/jmscslgroup/libpanda/blob/master/doc/image.md "https://github.com/jmscslgroup/libpanda/blob/master/doc/image.md"
The majority of example source code to interface with the Panda is based on python and uses libusb. We chose to write our own C++ version due to performance issues found with minimalist implementations in Python. This effects both CPU usage nearing 92%, and missing nearly 50% of CAN data. Libpanda is able to perform the same tasks as the Python version, with the addition of reading GPS data, at 35% usage, and with twice the throughput of data collection. These tests were performed on a Raspberry Pi 4. Here is a video demonstrating our findings:
Note: After the video was recorded some small tuning resulted in CPU usage closer to 35% instead of 50%
The hardware choice is based around running linux with comm.ai hardware, leveraging prior efforts in CAN bus access.
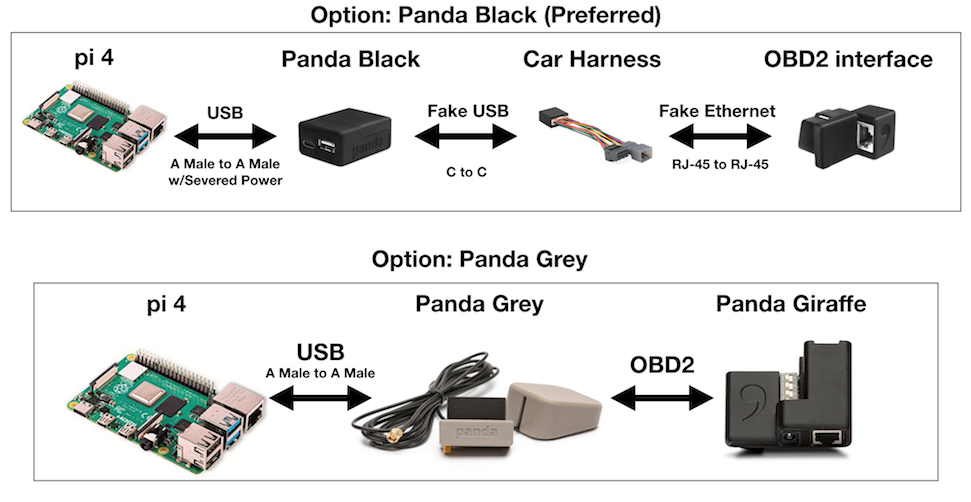
Both the Black Panda and Grey Panda(discontinued) is supported by libpanda. It is recommended to use the Black Panda since it can do everything the Grey Panda can do, but also can connect to the Car's OBD II port. This means that the Black Panda is capable of reading 3 total CAN busses for information, whereas the Grey Panda can only listen to 2 CAN busses. Comma.ai also sells a White Panda which features no GPS but WiFi instead. Libpanda will be able to work with the White Panda over USB and will diasble GPS methods, however it is not listed as a supported device due to libpanda's lack of WiFi connection support.
Be sure to select the "Black Panda" option when ordering the Car Harness. Also very importantly, read the Hardware Configuration section to understand how the Black Panda may brick your computer if not understood completely.
If you have the Grey Panda/Giraffe it is still supported by libpanda, however it has been discontinued and is no longer available for purchase.
Libpanda may be able to work on most linux machines, however the following hardware list is what is used for development and hould eliminate concerns of portability.
This is a nifty, inexpensive, and compact set of addressable LEDs that will be supported for displaying the state of various scripting components such as WiFi connectivity, data upload, and power states, but is not required for any functionality.
These items are for convenience and will not change the function of the baove hardware, but may be needed if you are new to using a Raspberry Pi.
The x728 and batteries are shown as optional since they are not required to record data, nor needed for future control of the vehicle. They will allow for the automatic data-upload upon power shut-down from the vehicle by maintaining power to the Pi, which will be able to detect the new power state and invoke a CyVerse data synchronization before shutting itself down.
There are multiple ways to power the x728 board in a car that can make use of automatic data upload scripts. The most important part for functionality as intended is that the power source turns off when the car is turned off.
For fastest charging at 3A, and for power debugging, the following list provides power information when in use. This list requires a small amount of assembly.
Note: The 2.5mm x 5.5mm uses 22 AWG wire shich may be too small for 3A charging, yet to be evaluated.
For full 3A charging using USB with minimal install, you can use a a USB to 5.5mmx2.5mm barrel jack cable with higher current cigarette lighter USB source
Alternatively, if your vehicle has USB ports that turn off when the car is shut off, then you may use a USB mini cable with a maximum supported charge current of 2A.
The Panda serves as a bridge between the vehicle's CAN bus and USB. The Grey Panda uses a standard OBD II connector whereas the Black Panda interfaces using special connectors. The OBD port is a standardized connector guaranteed to be on any car newer than 1996 for emmissions pruproses. This means that the Grey/White Panda can connect to any car, however some caveats to this have been noted:
With this in mind, be cautious on the car that you wish to plug the Panda into, as the connector may be standardized but the pinout varies. It is safest to only collect data on cars supported by comma.ai.
>Note: The Grey Panda has been discontinued but this information will remain for those that still have the Grey/Giraffe setup.
The OBD II port is intended for emmissions and mechanic diagnostics. In order to read lower-level data, the Giraffe exposes deeped CAN buses and adapts them to an OBD II port. This enables reading of a vehicle's Radar data. The Giraffe also feature DIP switches for setting different modes, including enabling writing to the CAN bus for vehicel control. Currently we have the DIP switches are configures as follows:

The Black Panda does not feature any DIP switches, but the associated Car Harness, if matched to the vehicle, should be all that is needed. There is a caveat to the installation of the black panda when not using comma.ai's EON. First let's discuss the power methodology regarding the Black Panda/Car Harness/EON intended use case:
>Note: The above items were found out by assuming that the USB connectors followed standard protocols but this is very importantly not the case. Thus to make use of the Black Panda, modification or special parts must be ordered to not cause any hardware failure.
Fortunately htere are a few workarounds that will let you safely make use of the Black Panda.
The least invasive method is to purchase a cable that has only the data lines connected. These are however difficult to comeby. One example of a cable is this power-switchable cable, however please keep in mind that you must ensure that the switch is never accidentally flipped. Also, this means that a person new tot he Black Panda may be unaware of the cables importance, bypass the cable, and cause hardware damage.
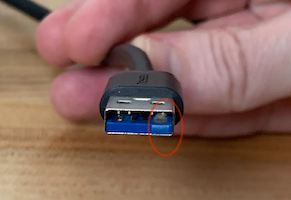
A simple solution without the purchase of a separate adapter that can be easily done at home is to tape-off the +5V line in the USB cable. In the following image, you can see the placement of the tape within the cable. This end may be plugged into either the Black Panda or the Raspberry Pi. This method is non-invasive and easily reversible. To read more about the pinouts with USB type A connectors, refer to this website. This method also has the same issue as using the adapter method above regarding having knowledge about the cable, but even moreso since the cable change with tape is subtle. A person could potentially swap out cables without realizing the tape is on the old cable, causing hardware damage.
As with the scotch-tape method above, this method involves disconencting power but through a more invasive method. Again, this website should be read regarding pinouts to understand what this modification does. This method involves the disassembly of the Black Panda to sever the +5V line directly on the USB connector. Fortunately this can be done in a number of ways, using some snipping tool or a soldering iron, and disassembly is a breeze. I personally prefer this method to the above two since this will ensure that the Black Panda will never be able to fry a computer. Also depending on the method of modification, this may be reversible using a soldering iron. The following image shows the steps to modify the Black Panda:
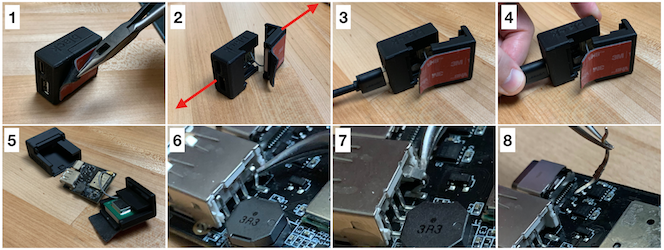
Reassmbly may be done by following steps 1, 2, and 5 in reverse.
TBD

Currently Ubuntu 18.04 LTS is the only supported OS though it is very possible that libpanda will work just fine on other *nix based platforms. To install Ubuntu 18.04 LTS on the Raspberry Pi 4, you will need a method to write to micro SD cards (see Optional Hardware). Follow the tutorial on Ubuntu's website for downloding and flashing based on your own OS:
Once the OS is flashed, insert the SD card into the Pi 4. Ethernet is by default enabled with a DHCP client. There are two ways to configure the Pi 4 from this point, either by plugging in a keyboard and monitor using the HDMI adapter from the Optional Hardware, or through the preinstalled SSH server. The default credentials for this image are:
The default username can be changed, but is out of scope for this tutorial.
Here is an example of logging into a Pi after obtaining an IP address of 10.0.1.80:
Use this page for tutorial on setting up iCommands on Linux, MacOC, or Windows.
If you have flashed an image with iRods installed, or you've installed it yourself, make sure to run the iinit command to setup your interface.
If you have an image with iCommands pre-installed, look for and run 'sudo ./setVin.sh' to set you VIN as an ID for your data files.
Libpanda is a multithreaded C++ based library for custom Panda interface applications using the observer based software design pattern (i.e. callbacks). Also featured in the software area set of premade data recording utilities, simple data visualizers, startup services, and network handling services. The utilities save CSV formatted data that is supported by Rahul Bhadani's Strym.
Installation requires an internet connection. Ethernet is the easiest form to provide internet. Once logged into your Pi 4 (either SSH or keyboard/monitor), try pinging Google's DNS server to check for receivng bytes from 8.8.8.8:
If successful, run the following to download and install libpanda. This will take a few minutes to complete:
Note: The above video may show different results as development continues.
The [libpanda setup process](libpanda-setup) installs a set of startup scripts using linux's systemd. These scripts
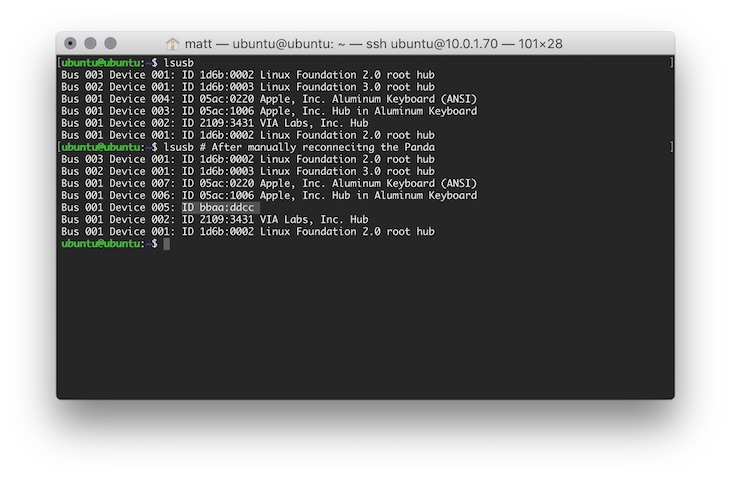
Note: We currently are aware of an issue where when the Pi 4 is soft rebooted (i.e. sudo reboot), the Panda device fails to be recognized. In the case of a hard boot (i.e. reconnecting Pi 4 power), this problem does not occur. In the following example, you can see how to check for Oanda USB connectivitiy by performing the command lsusb. This is the result afeter a soft boot, then the Panda was reconnected, followed by andother lsusb to check for its presence.
Systemd provides a set of utilities to work with services. To check on the status of one of the above services:
To exit the status check, press 'q'.
A similar command for checking status is journalctl. This may be run as follows:
Press ctrl-c to exit journalctl.
These services should automatically start and take control of the Panda. To run other utilities, you can manually stop a service, or start it up later. Restarting a service effectively performs a stop, then a start. Here are useful commands for this scenario:
This is an example of when the services show a fialed status, and how to reset them:
If you are in a development environment then it can be annoying to have these services automatically take control fo the Panda. In this case you can disable and later re-enable services by performing the following:
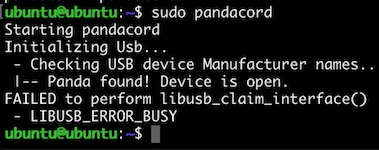
In order to run the following utilities, ensure that no services are currently running that use the Panda. For example on a fresh boot with services still enabled, run the following:
The error you may receive if the Panda device is already in use will look similar to the following error:
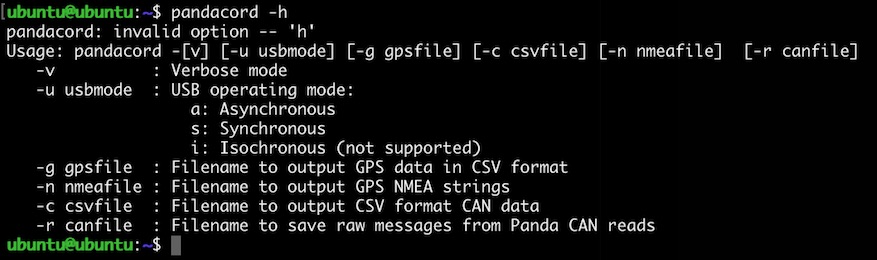
This program is the same program invoked by the pandarecord systemd service. In the case of the systemd service, directories and filenames are hardcoded to a pre-defined directory. Running the service manually lets the user specify filenames. The following records CSV formatted data to the specified filenames in the current working directory:
To finish recording press ctrl-c. More options for file saving are possible by providing the "-h" argument.
Here is a video showing a successful run of pandacord, however no CAN bus was physically conencted in this demonstration:
As similar to pandacord, pandaSetSystemTime is the program invoked by the pandasettime systemd service. This program opens the Panda, continuously reads the GPS and waits for a fix, compares the system clock against GPS time, then resets the system clock if beyond an epsilon of 0.2 seconds.
Note: This video is showing an older method of invoking pandaSetSytemTime but provides the same output.
pandaCurses is an example program that uses ncurses for viewing data-in-real-time (DIRT). Both GPS and CAN data are handled in different views. For GPS, all reported statistics, as configured by the the ublox m8030 are displayed. The CAN visualization is similar to eh *nix program "top", allowing for sorting of different metrics of live data. This program is not currently installed and needs run in a different manner. Data logging is also provided if the correct arguments are provided (see usage statement).
When run, pressing the 'g' key siwtches between view modes for GPS and CAN data.
Note: In the above video example the argument "-f" was provided. This fakes CAN data for testing purposes and should not be used. This was used purely for demonstration.
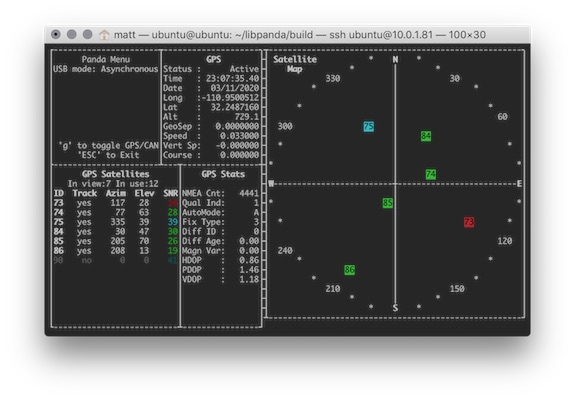
The GPS provides a simple display of the state reported by the GPS module after parsing NMEA messages. This may be used to assess the quality of antenna placement based on the current set of viewable satellites.
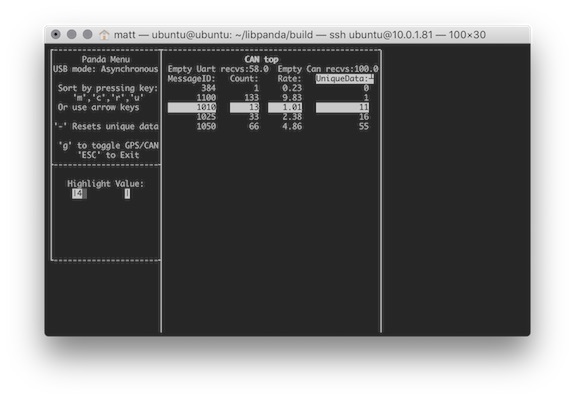
This represents a similar structure to the program "top". When in this view, the arrow keys can select a column and change the ordering (high-low or low-high) of the current column.
When a particular column is selected, the "Highlight Value:" fiel in the lower left lets the user type in a number for particualr data to be highlighted. Once a number is typed, press the "enter" key to perform the highlight. For MessageID, Count, and UniqueData, all current values matching "Highlight Value" will be immediately highlight, and persist even if the value changes. For Rate, this highlights anything withing +/-1 from "Highlight Value".
UniqueData is intended to be used for reverse-engineering of vehicle ocmponents. In the case of constantly changing data such as floating point values for engine status reports, UniqueData may not be an effective method. For messages that involve reporting discrete states, UniqueData can easily highlight messages that changed absed on interacting with the vehicle. The effective sequence of this interaction is as follows:
Note: Do not follow the installation instructions provided by the manufacturer. We have provided an installation script that functions for our use case.
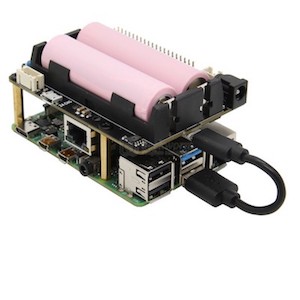
The x728 is a battery backup solution for the Raspberry Pi, using GPIO pins 4, 17, and 18 along with i2c. The documentation of the particular hardware is a bit lacking, but the functionality is sufficient for data collection applications. Some preliminary data was taken in regard to charge/discharge times under expected use:
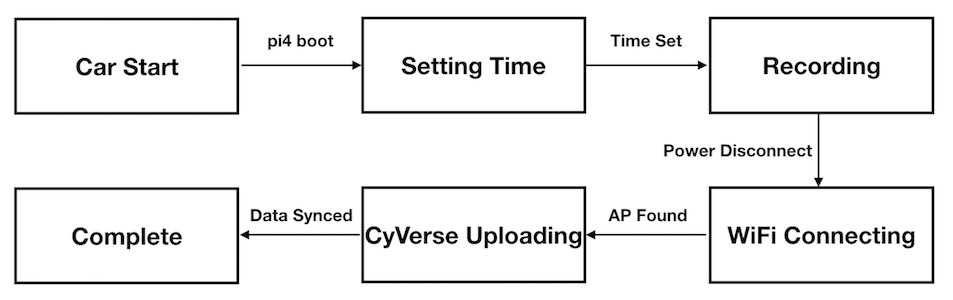
For use with the CIRCLES project, the installation script in libpanda->scripts->x728 sets up the necessary start scripts to automatically shut down the Pi in a safe manner. The statemachine for the boot process is shown in the following state diagram. The x728 allows the state machine to detect a power outage, then invoke the necessary scripts for wifi connectivity and cyverse data uploading, then finally invoke a safe shutdown when all data has been uploaded.
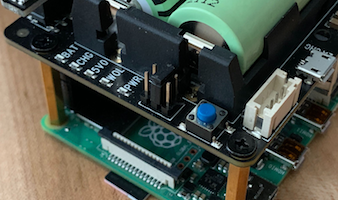
The x728 may operate in certain modes based on the installation of certain jumpers per the x728's user manual. The scripts provided by the libpanda project are based on the jumper settings in the following image. This ensures that the x728 will apply power to the Raspberry Pi when power is re-established, e.g. when starting a car. This jumper is labelled on the x728 PCB as "Auto SD". The "Auto On" feature appears to leave the Raspberry Pi powered after a shutdown event, which is why a jumper should not be installed in this location. The "Lan PWR" jumper allows for power to be applied to the ethernet port for WOL funcitonality which is not needed for this porject. Also, the x728 ships with a small USB cable for a built-in USB-Ethernet adapter. Again, since WOL is not needed for the CIRCLES project, this cable does not need ot be installed.
To install the x728 software for the above state machine, navigate to the installation directory for the x728. Then, invoke the installation script.
This installation process involves the compilation of two C programs, installs a script to invoke a system shutdown, and installs two systemd services.
To manually invoke a system shutdown:
Invoking the shutdown works by signaling to the x728 that a shutdown is taking place, at which the x728 signals back to the Pi via GPIO that a shutdown should take place. The x725button service listens for this and invokes the shutdown automatically. To check on the systemd button status:
The x728 script is automatically invoked based on the power conditions as measured by the x725power service. These conditions include a power input interrupt, low battery voltage, or low battery capacity. The overall flow of signals is therefore:
x725power -> x725shutdown -> x725button
Again, the status may be checked with systemctl:
If you desire to not have the system automatically shutdown upon, such as for when you are debugging the car during starting and stopping the engine, then disable the x725power script:
To return to normal operation:
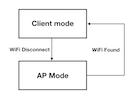
The directory libpanda/scripts/pi4wifi provides a set of installation scripts for the automatic connection of WiFi for future automatic data uploading. When a known wifi Access Point (AP) is not available, then the scripts with generate an AP for easy connection with a phone or laptop for Raspberry Pi debugging. A very high level view of these scripts in the form of a state machine is as follows:
The pi4wifi directory has an installation script for easy setup. Simply run this script for installation of dependencies, along with the removal of confliciting packages. The main script is called "crazypifi.sh" and is dependent on hostapd, isc-dhcp-server, wpa_supplicant, iw, and ifupdown. On Ubuntu 18.04, netplan is the default network interface manager but needs to be removed for the use of ifupdown. Please make a note of this if you need netplan for other applications. Again, running the install.sh script will handle all of installation needed.
During installation you will be asked to enter a WiFi SSID and passphrase. It is not checked upon entering, so if you have connection issues you may need to correct your passphrase later. The passphrase and SSID are stored in a wpa_supplicant configuration file, specifically you may edit known wifi SSIDs and passphrases using nano as follows:
The installation script also installs crazypifi.sh as a service, called crazypifi. As with the prior service scripts covered above, you may use systemctl to check the status, stop/start/restart the service, or enable/disable on boot:
Data visualization is currently handled by Strym.
A tutorial for Strym can be found here.
Currently all data is intended to be uploaded to CyVerse. In order to acess data we need to grant you access in an account-by-account basis. Please request access from someone at the JMS CSL Group. Currently data is manually uploaded to CyVerse directly from the Pi 4, but with manual commands at the end of each colleciton session. Eventually we will provide methods to perform uploads automatically. This is also why the power supply has yet to be determined for the Pi 4, since power needs to remain after the car is shut off to give time for the Pi to connect to wifi and transfer data.
To access Cyverse data after you have created an account and have been granted access:

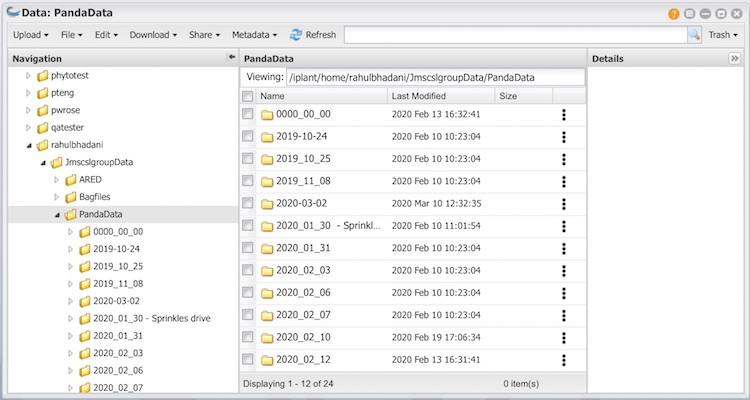
Note: Data between different days may show to have inconsistent formatting due to the development process of data collection. Also, some data may be available along with a video of the collection session that may be used for data evaluation.
 1.8.11

